HOW TO OPERATE AND INSTALL KONTROLFREEK GAMING LIGHTS™

INSTALLATION
Follow these simple steps to add KontrolFreek Gaming Lights into your setup.
STEP 1: CHOOSE YOUR SPOT
KontrolFreek Gaming Lights can be placed on most flat surfaces and can be installed on curved corners or 90* degree turns with simple folds of the LED strip. While visualizing your setup, make sure you have access to a USB outlet to power the lights.
STEP 2: MEASURE YOUR REQUIRED LENGTH
Once you pick the place for them, make sure that the light strips are long enough to cover the entire area with ease. Our Gaming Lights kit ships with 9ft/2.74m of LED strips.
STEP 3: PLACE THE STRIPS
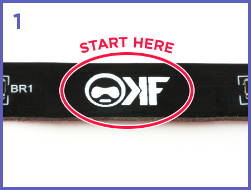
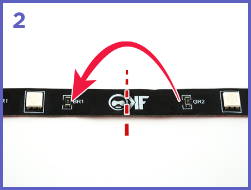
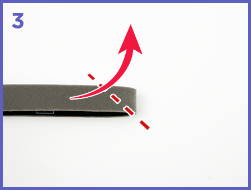
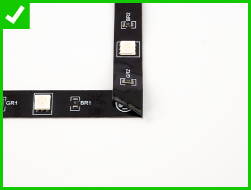
Clean and dry the surface area before removing the adhesive backer and pressing the strip firmly down. Pro tip: Place a single strip at a time for a fast and clean installation. If you need to make a 90* angle, follow these three simple steps:1. Locate the closest KontrolFreek Icon to the section you want to fold.2. Fold the strip once at the icon so the adhesive side faces out.3. Fold the strip a second time in the opposite direction upwards to create a neat 90* angle that won’t interfere with the LED’s, electronics or connections.
1. Locate the closest KontrolFreek Icon to the section you want to fold.
2. Fold the strip once at the icon so the adhesive side faces out.
3. Fold the strip a second time in the opposite direction upwards to create a neat 90* angle that won’t interfere with the LED’s, electronics or connections.
STEP 4: PLUG INTO A USB POWER SOURCE
Once you have connected and placed the light strips, the final step is to plug in the USB Power Strip. Game On!
INSTRUCTIONS

- Power On - Press1
 time
time - Color - Press
 to cycle 20 shades
 - Effect - Press
 to cycle 19 patterns
 - Brightness - Press
 and then
  to cycle 5 levels
 - Speed - Press
 and then
  to cycle 5 levels
 - Power Off - Press and hold
 for 3 seconds
設備
次の簡単な手順に従って、セットアップにKontrolFreek Gaming Lightsを追加します
ステップ1:場所を選択する
KontrolFreek Gaming Lightsは、ほとんどの平らな面に設置ができ、湾曲したコーナーや、LEDストリップを折りたたむだけで90 *度回転させることができます。セットアップを想像しながら、ライトに電力を供給するUSBコンセントにアクセスができることを確認してください。
ステップ2:必要な長さを測定する
場所を選択したら、ライトストリップが領域全体を簡単にカバーするのに十分な長さであることを確認してください。 当社のGaming Lightsキットには、9ft / 2.74mのLEDストリップが付属しています。設置に追加の長さが必要な場合は、18インチ(45.7cm)の延長ストリップをここで購入できます。
ステップ3:ストリップを配置する
接着バッカーを取り外す前およびストリップをしっかりと押し下げる前に、表面をきれいにして乾燥させます。 プロのヒント:すばやくきれいに取り付けるには、一度に1つのストリップを配置します。 90度の角度を作る必要がある場合は、次の3つの簡単な手順に従ってください。 折りたたむセクションに最も近いKontrolFreekアイコンを見つけます。
1. ストリップをアイコンで一度折り、接着面を外側に向けます。
2. ストリップをもう一度反対方向に上向きに折り曲げて、LED、電子機器、または接続に干渉しないきちんと
3. した90 *の角度を作成します


手順4:USB電源に接続します
ライトストリップを接続して配置したら、最後の手順としてUSBパワーストリップを差し込みます。 ゲームスタート!
使用説明書

- 電源オン-
 を1回押します
 - 色-
 を押して20色を循環
 - 効果-
 を押して20パターンを循環
 - 明るさ-
 を押してから
  を押して8レベルを循環させます
 - 速度-
 を押してから
  を押すと、8レベルが循環します
 - 電源オフ-
 を3秒間押し続けます
INSTALLATION
Suivez ces instructions simples pour ajouter KontrolFreek Gaming Lights à votre configuration.
ÉTAPE 1: CHOISISSEZ VOTRE PLACE
KontrolFreek Gaming Lights peuvent être placés sur la plupart des surfaces planes et peuvent être installés sur des coins incurvés ou des virages à 90 degrés avec un simple pliage de la bande LED. Assurez-vous d’avoir accès à une prise USB pour alimenter les lumières avant la configuration.
ÉTAPE 2: MESURER LA LONGUEUR REQUISE
Après avoir choisi un endroit pour les lumières, assurez-vous que les phares de lumière sont suffisamment longs pour couvrir toute la zone avec facilité. Notre kit Gaming Lights est livré avec 9 pieds / 2,74 m de bandes LED. Si votre installation nécessite une longueur supplémentaire, vous pouvez acheter des bandes d’extension de 45,7 cm
ÉTAPE 3: PLACEZ LES LUMIÈRES
Nettoyez et séchez la surface avant de retirer le support adhésif et appuyez fermement sur la bande. Conseil de pro: placez une seule bande à la fois pour une installation rapide et propre. Si vous devez faire un angle de 90 degrés, suivez ces trois étapes simples:
1. Trouvez l’icône KontrolFreek la plus proche de la section que vous souhaitez plier.
2. Pliez la bande une fois sur l’icône de sorte que le côté adhésif soit orienté vers l’extérieur.
3. Pliez la bande une deuxième fois dans la direction opposée vers le haut pour créer un angle de 90 degrés qui n’interférera pas avec les LED, l’électronique ou les connexions.


ÉTAPE 4: BRANCHEZ SUR UNE SOURCE D'ALIMENTATION USB.
Lorsque vous avez connecté et placé les bandes lumineuses, la dernière étape consiste à brancher la bande d’alimentation USB. Jeu!
INSTRUCTIONS

- Allumer - Appuyez1
 fois
fois - Couleur - Appuyez
 pour faire défiler 20 teintes
 - Effet - Appuyez
 pour faire défiler 20 motifs
 - Luminosité - Appuyez
 et puis
  pour cycle 8 niveau
 - Vitesse - Appuyez
 et puis
  pour faire défiler 8 niveaux
 - Éteindre - Appuyez et maintenez
 pendant 3 secondes
INSTALLAZIONE
Segui questi semplici passaggi per aggiungere KontrolFreek Gaming Lights alla tua configurazione.
1: SCEGLI LA TUA POSIZIONE
KontrolFreek Gaming Lights possono essere posizionate sulla maggior parte delle superfici piane e possono essere applicate sugli angoli o curve a 90 * gradi con semplici pieghe sulla striscia LED. Durante la configurazione, assicurati di avere una presa USB per alimentare le luci.
2: MISURA LA LUNGHEZZA NECESSARIA
Una volta scelto il luogo giusto, assicurati che la striscia LED sia abbastanza lunga da coprire l’intera area con facilità. Il nostro kit Gaming Lights viene fornito con strisce LED da 274 cm. di lunghezza. Se l’installazione richiede una lunghezza aggiuntiva, qui è possibile acquistare strisce aggiuntive da 45,7 cm.
3: POSIZIONARE LE STRISCE
Pulire e asciugare la superficie prima di rimuovere la protezione adesiva, poi premere con decisione la striscia verso il basso. Suggerimento professionale: posiziona una singola striscia alla volta per un’applicazione rapida e precisa. Se devi creare un angolo di 90 *, segui questi tre semplici passaggi.
1. Individua l’icona KontrolFreek più vicina alla sezione che desideri piegare.
2. Piegare la striscia una volta sull’icona in modo che il lato adesivo sia rivolto verso l’esterno.
3. Piegare la striscia una seconda volta nella direzione opposta verso l’alto per creare un angolo perfetto di 90 * che non interferisca con i LED, i componenti elettronici o le connessioni.


4: COLLEGARE A UNA PRESA ALIMENTATA USB
Dopo aver collegato e posizionato le strisce LED, il passaggio finale consiste nel collegare la presa USB all’alimentazione. Che il gioco abbia inizio !
ISTRUZIONI

- Accensione - Premere
 1 votla
 - Colore - Premere
 per scorrere 20 tonalità
 - Effeto - Premere
 per scorrere 20 motivi
 - Luminosità - Premere
 e quindi
  per scorrere 8 livelli
 - Velocità - Premere
 , quindi
  per scorrere 8 livelli
 - Spegnimento - Tenere premuto
 per 3 secondi
INSTALLATION
Folge diesen einfachen Schritten, um die KontrolFreek Gaming Lights in deinen Aufbau zu integrieren.
SCHRITT 1: WÄHLE DEN ORT
KontrolFreek Gaming Lights können auf den meisten ebenen Flächen platziert werden und können, durch einfaches Falten des LED-Streifens, an gekrümmten Ecken oder 90-Grad-Drehungen, installiert werden. Während du dir den Aufbau vorstellst, stelle sicher, dass eine USB-Steckdose in der Nähe ist, um die Lichter mit Strom zu versorgen.
SCHRITT 2: MESSE DIE ERFORDERLICHE LÄNGE
Sobald du den Platz für die Lichter ausgewählt hast, stelle sicher, dass die Lichtstreifen lang genug sind, um den gesamten Bereich problemlos zu umfassen. Unsere Gaming Lights Ausrüstung wird mit einem 2,74m langen LED-Streifen geliefert. Wenn du zusätzliche Länge für die Installation benötigst, kannst du hier 45,7cm lange Verlängerungsstreifen kaufen.
SCHRITT 3: PLAZIERE DIE STREIFEN
Reinige und trockne die Oberfläche bevor du den Klebestreifen abziehst, danach drücke den Streifen fest an. Profi-Tipp: Für eine schnelle und saubere Installation, platziere die einzelnen Streifen nacheinander. Wenn du einen 90° Winkel einbauen möchtest, folge diesen drei einfachen Schritten.
1. Suchen das KontrolFreek-Symbol, das dem zu faltenden Abschnitt am nächsten liegt.
2. Falte den Streifen einmal am Symbol, sodass die klebende Seite nach außen zeigt.
3. Falte den Streifen ein zweites Mal in die entgegengesetzte Richtung nach oben, um einen sauberen Winkel von 90 ° zu erzeugen und der die LEDs, die Elektronik oder die Anschlüsse nicht beeinträchtigt.


SCHRITT 4: STECKE ES IN EINE USB-STROMQUELLE EIN
Nachdem du die Lichtstreifen angeschlossen und platziert hast, musst du nur noch die USB-Steckdosenleiste einstecken. Los geht’s!
ANLEITUNG

- Anschalten - Drücke
 einmal
 - Farbe - Drücke
 um zwischen 20 Farbtönen zu wählen
 - Effekt - Drücke
 um zwischen 20 Mustern zu wählen
 - Helligkeit - Drücke
 und dann
  um zwischen 8 Stufen zu wählen
 - Geschwindigkeit - Drücke
 und dann
  um zwischen 8 Stufen zu wählen
 - Ausschalten - Halte
 für drei Sekunden gedrückt
INSTALACIÓN
Sigue estos sencillos pasos para añadir las KontrolFreek Gaming Lights™ a tu setup.
PASO 1: ELIGE TU SITIO
KontrolFreek Gaming Lights pueden ser posicionadas en la mayoria de superficies planas y pueden ser instaladas en esquinas curvadas o the 90* con una simples dobladuras en la tira LED. Ten en cuenta que debes de tener un conector USB cercano para que puedan ser encendidas.
PASO 2: MIDE LA LONGITUD NECESARIA
Una vez hayas elegido el sitio idóneo, asegurate de que las luces son lo suficientemente largas como para cubrir todo el área. Nuestras Gaming Lights tiene 2,47m de luces LED. Si tu instalacion require una más luces puedes comprar la extension de 45,7cm aquí.
PASO 3: POSICIONA LAS LUCES
Limpia y seca la superficie antes de quitar el adhesive que hay en la parte posterior de las luces. Pro tip: posiciona cada luz individualmente para una instalación más sencilla. Si tienes que hacer un ángulo de 90*, sigue los siguientes pasos.
1. Localiza el logo de KontrolFreek más cercano a la sección que quieres doblar.
2. Dobla la tira al lado del logo para que el adhesive mire para fuera.
3. Dobla la tira una segunda vez en la dirección contraria hacia arriba creando un ángulo de 90* perfecto que no va interferir con los LEDS ni con los conectores.


PASO 4: ENCHÚFALO A UN CONECTOR USB
Una vez hayas conectado y posicionado las tiras de luces, el paso final es conectarlo a un conector USB. Empieza el juego!
INSTRUCCIONES

- Power On - Aprieta
 1 vez
1 vez - Color - Aprieta
 para empezar el ciclo de 20
 - Efecto - Aprieta
 para empezar el ciclo de 20 formas
 - Brillo - Aprieta
 y luego
  para ajustar el brillo a 8 intensidades distintas
 - Rapidez - Aprieta
 y luego
  para ajustar los 8 niveles
 - Power Off - Aprieta y
 durante 3 segundos
- Choosing a selection results in a full page refresh.


 time
time to cycle 20 shades
 to cycle 19 patterns


